
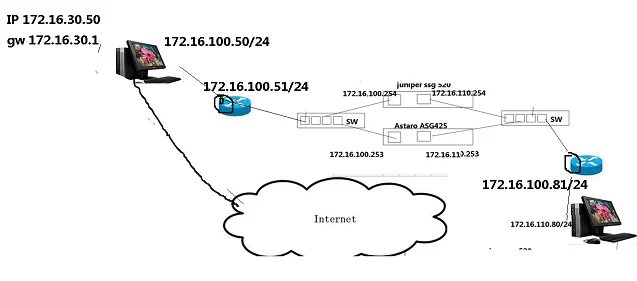
拓扑如下
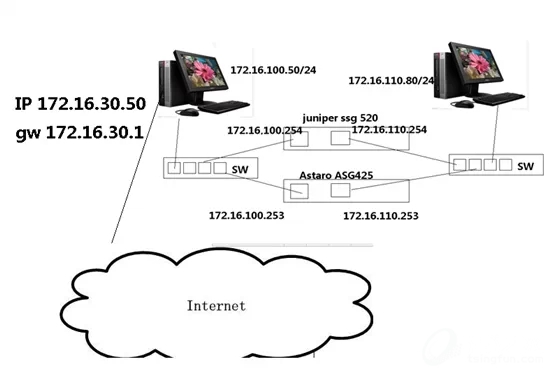
主机A ,B有两个可用路由要实现主备切换,当主防火墙出现问题的时候,可以自动切换到备防火墙上。
第一台设备 ASG 425 支持OSPF BGP PIM路由协议
第二台设备SSG 520
支持BGP OSPF PIM RIP 路由协议
第一种方法
说明:两个防火墙属于不同品牌HA 等技术想都不用想了,想通过VRRP实现主备切换, juniper 我只发现了NSRP 的选项 Astarto 根本就木有这个选项
看来两个不同品牌的防火墙想组成高可靠性集群不大可能。
从防火墙本身来解决这个问题的路被堵死了换个思路
第二种方法
由于我们的客户端都是LINUX 主机。所以打算利用linux 强大的route 功能
在主机A 上执行命令
route add -host 172.16.110.80 gw 172.16.100.253
route add -host 172.16.110.80 gw 172.16.100.254
在主机B 上执行命令
route add -host 172.16.100.50 gw 172.16.100.253
route add -host 172.16.100.50 gw 172.16.100.254
执行ping 命令 可以通但是拔掉 asg 425防火墙的网线 就ping 不通了。
查找资料知道 在linux 系统下 系统会查看本地路由表,如果有多条相同网络的路由,只会默认选择第一条,其他的不起作用。此方法不通
第三种方法
利用linux的策略路由
网上查找的参考资料
http://www.cnblogs.com/gunl/archive/2010/09/14/1826234.html
知识准备
一、原理说明
1、路由表(table)从0到255进行编号,每个编号可以对应一个别名,编号和别名的对应关系在linux下放在/etc/iproute2/rt_tables这个文件里,一般0编号
的table对应的别名为upspec,255编号对应的别名为local,254和253对应的别名分别为main和default,我们通常用route命令配置和查看的路由表信息为别名
为main的路由表信息。
2、路由规则负责定义路由策略,它定义来源哪里的IP需要查询哪个路由表(使用别名)。路由规则的查看使用ip rule sh路由规则也从0开始编号,可以自由添
加,来源相同IP的路由规则选择根据规则编号的大小确定优先级,编号越小优先级越高。例如如下路由规则:
0: from all lookup local
32766: from all lookup main
32767: from all lookup default
优先级最高的规则是0,要查询的路由表名称是local,其次是32766,要查询的路由表名称是main,后面依此类推。
3、操作系统在选路时首先根据路由规则选取table,然后再从table里选取相应路由,如果同一table里不同接口使用相同的网关,选路时会默认选择第一条路由
,所以当有两个网络接口卡时,如果目标网络在同一网段,那么由于选路时按第一条路由出口出去,所以会导致所有的流量都会从第一个网卡上出去
在主机A 上执行命令
ip route add 172.16.110.0/24 via 172.16.100.253 dev bond1
ip route add 172.16.110.0/24 via 172.16.100.254 dev bond1
在主机B 上执行命令
ip route add 172.16.100.0/24 via 172.16.110.253 dev bond1
ip route add 172.16.100.0/24 via 172.16.110.254 dev bond1
添加一个路由表
echo 520 test >> /etc/iproute2/rt_tables
使用策略路由使172.16.100.0/24网段的主机可以通过172.16.100.254这个网关上网
ip rule add from 172.16.100.0/24 dev bond1 table test pref 32765
ip route add default 172.16.100.254 dev bond1
iptables –t nat –A POSTROUTING –s 172.16.100.0/24 –j MASQUERADE
测试结果还是一样。
原因分析
Linux的 策略路由功能的确很强大,可以设定不同的流量走不同的路径。或者相同的流量从不通的端口流出。做到负载均衡。
而我的的要求是相同的流量走相同的口,而相同的口里面有两个可用路由。
Linux 默认还是只认第一条匹配的路由。
后来想想这个根本就不是策略路由可以解决的,属于动态路由中多路径可用的范畴。
所有想到
第四种解决办法
网上找到的参考资料
把linux 变成一台路由器
Zebra介绍介绍
Zebra 是一个 TPC/IP 路由软件,支持 BGP-4、BGP-4+、OSPFv2、OSPFv3、RIPv1、RIPv2 和 RIPng。它的发行遵循 GNU 通用公共许可协议,可以运行于 Linux 以及其他一些 Unix 变体操作系统上。Zebra 是那些系统最新的发行版本中的路由软件。最新版本的 Zebra 以及文档可以从 GNU Zebra 网站上下载:http://www.zebra.org/ Zebra ;的设计独特,采用模块的方法来管理协议。可以根据网络需要启用或者禁用协议。
Zebra 最为实用的一点是它的配置形式同 Cisco IOS 极其类似。尽管它的配置与 IOS 相比还是有一些不同,但是这对于那些已经熟悉 IOS 的网络工程师来说在这种环境下工作将相当自如。
安装安装
1、下载下载
ftp://ftp.zebra.org/pub/zebra/zebra-0.95a.tar.gz 2、安装过程安装过程
[root@RS1 mnt]# gunzip zebra-0.95a.tar.gz
[root@RS1 mnt]# tar xvf zebra-0.95a.tar
会在当前目录下自动生成一个zebra-0.95a子目录,进入zebra-0.95a目录后执行以下命令安装
[root@RS1 zebra-0.95a]# ./configure
编译出错
接下来是配置本地YUM 然后安装GCC,aclocal,autoconf,automake等包
后来发现这些包都装了,于是万能的百度上场
关闭IPV6 还是不行
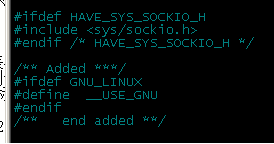
打开zebra-0.95a/lib/zebra.h文件,
定位到103行,添加如下内容,即可解决。
Vi 定位
1: 快速到最后一行:shift + G
2:快速到第一行: 1 + shift +G
3: 快速到第40 行: 40 + shift + G
#ifdef GNU_LINUX
#define __USE_GNU
#endif
========
问题解决
#include <netinet/in_systm.h>
[root@RS1 zebra-0.95a]# make install
Making install in lib
make[1]: Entering directory `/mnt/zebra-0.95a/lib'
make[2]: Entering directory `/mnt/zebra-0.95a/lib'
make[2]: Nothing to be done for `install-exec-am'.
make[2]: Nothing to be done for `install-data-am'.
make[2]: Leaving directory `/mnt/zebra-0.95a/lib'
make[1]: Leaving directory `/mnt/zebra-0.95a/lib'
Making install in zebra
make[1]: Entering directory `/mnt/zebra-0.95a/zebra'
make[2]: Entering directory `/mnt/zebra-0.95a/zebra'
/bin/sh ../mkinstalldirs /usr/local/sbin
/usr/bin/install -c zebra /usr/local/sbin/zebra
/bin/sh ../mkinstalldirs /usr/local/etc
/usr/bin/install -c -m 600 ./zebra.conf.sample /usr/local/etc/zebra.conf.sample
make[2]: Nothing to be done for `install-data-am'.
make[2]: Leaving directory `/mnt/zebra-0.95a/zebra'
make[1]: Leaving directory `/mnt/zebra-0.95a/zebra'
Making install in bgpd
make[1]: Entering directory `/mnt/zebra-0.95a/bgpd'
make[2]: Entering directory `/mnt/zebra-0.95a/bgpd'
/bin/sh ../mkinstalldirs /usr/local/sbin
/usr/bin/install -c bgpd /usr/local/sbin/bgpd
/bin/sh ../mkinstalldirs /usr/local/etc
/usr/bin/install -c -m 600 ./bgpd.conf.sample /usr/local/etc/bgpd.conf.sample
/usr/bin/install -c -m 600 ./bgpd.conf.sample2 /usr/local/etc/bgpd.conf.sample2
make[2]: Nothing to be done for `install-data-am'.
make[2]: Leaving directory `/mnt/zebra-0.95a/bgpd'
make[1]: Leaving directory `/mnt/zebra-0.95a/bgpd'
Making install in ripd
make[1]: Entering directory `/mnt/zebra-0.95a/ripd'
make[2]: Entering directory `/mnt/zebra-0.95a/ripd'
/bin/sh ../mkinstalldirs /usr/local/sbin
/usr/bin/install -c ripd /usr/local/sbin/ripd
/bin/sh ../mkinstalldirs /usr/local/etc
/usr/bin/install -c -m 600 ./ripd.conf.sample /usr/local/etc/ripd.conf.sample
make[2]: Nothing to be done for `install-data-am'.
make[2]: Leaving directory `/mnt/zebra-0.95a/ripd'
make[1]: Leaving directory `/mnt/zebra-0.95a/ripd'
Making install in ripngd
make[1]: Entering directory `/mnt/zebra-0.95a/ripngd'
make[2]: Entering directory `/mnt/zebra-0.95a/ripngd'
/bin/sh ../mkinstalldirs /usr/local/sbin
/usr/bin/install -c ripngd /usr/local/sbin/ripngd
/bin/sh ../mkinstalldirs /usr/local/etc
/usr/bin/install -c -m 600 ./ripngd.conf.sample /usr/local/etc/ripngd.conf.sample
make[2]: Nothing to be done for `install-data-am'.
make[2]: Leaving directory `/mnt/zebra-0.95a/ripngd'
make[1]: Leaving directory `/mnt/zebra-0.95a/ripngd'
Making install in ospfd
make[1]: Entering directory `/mnt/zebra-0.95a/ospfd'
make[2]: Entering directory `/mnt/zebra-0.95a/ospfd'
/bin/sh ../mkinstalldirs /usr/local/sbin
/usr/bin/install -c ospfd /usr/local/sbin/ospfd
/bin/sh ../mkinstalldirs /usr/local/etc
/usr/bin/install -c -m 600 ./ospfd.conf.sample /usr/local/etc/ospfd.conf.sample
make[2]: Nothing to be done for `install-data-am'.
make[2]: Leaving directory `/mnt/zebra-0.95a/ospfd'
make[1]: Leaving directory `/mnt/zebra-0.95a/ospfd'
Making install in ospf6d
make[1]: Entering directory `/mnt/zebra-0.95a/ospf6d'
make[2]: Entering directory `/mnt/zebra-0.95a/ospf6d'
/bin/sh ../mkinstalldirs /usr/local/sbin
/usr/bin/install -c ospf6d /usr/local/sbin/ospf6d
/bin/sh ../mkinstalldirs /usr/local/etc
/usr/bin/install -c -m 600 ./ospf6d.conf.sample /usr/local/etc/ospf6d.conf.sample
make[2]: Nothing to be done for `install-data-am'.
make[2]: Leaving directory `/mnt/zebra-0.95a/ospf6d'
make[1]: Leaving directory `/mnt/zebra-0.95a/ospf6d'
Making install in doc
make[1]: Entering directory `/mnt/zebra-0.95a/doc'
make[2]: Entering directory `/mnt/zebra-0.95a/doc'
make[2]: Nothing to be done for `install-exec-am'.
/bin/sh ../mkinstalldirs /usr/local/info
mkdir -p -- /usr/local/info
/usr/bin/install -c -m 644 ./zebra.info /usr/local/info/zebra.info
install-info --info-dir=/usr/local/info /usr/local/info/zebra.info
/bin/sh ../mkinstalldirs /usr/local/man/man1
mkdir -p -- /usr/local/man/man1
/usr/bin/install -c -m 644 ./vtysh.1 /usr/local/man/man1/vtysh.1
/bin/sh ../mkinstalldirs /usr/local/man/man8
mkdir -p -- /usr/local/man/man8
/usr/bin/install -c -m 644 ./bgpd.8 /usr/local/man/man8/bgpd.8
/usr/bin/install -c -m 644 ./ospf6d.8 /usr/local/man/man8/ospf6d.8
/usr/bin/install -c -m 644 ./ospfd.8 /usr/local/man/man8/ospfd.8
/usr/bin/install -c -m 644 ./ripd.8 /usr/local/man/man8/ripd.8
/usr/bin/install -c -m 644 ./ripngd.8 /usr/local/man/man8/ripngd.8
/usr/bin/install -c -m 644 ./zebra.8 /usr/local/man/man8/zebra.8
make[2]: Leaving directory `/mnt/zebra-0.95a/doc'
make[1]: Leaving directory `/mnt/zebra-0.95a/doc'
make[1]: Entering directory `/mnt/zebra-0.95a'
make[2]: Entering directory `/mnt/zebra-0.95a'
make[2]: Nothing to be done for `install-exec-am'.
make[2]: Nothing to be done for `install-data-am'.
make[2]: Leaving directory `/mnt/zebra-0.95a'
make[1]: Leaving directory `/mnt/zebra-0.95a'
[root@RS1 zebra-0.95a]#
安装完成后执行文件位于/usr/local/sbin,如下所示: # ls -l /usr/local/sbin
[root@RS1 zebra-0.95a]# ls -l /usr/local/sbin
总用量 8000
-rwxr-xr-x. 1 root root 2323159 10月 25 18:22 bgpd
-rwxr-xr-x. 1 root root 1358143 10月 25 18:22 ospf6d
-rwxr-xr-x. 1 root root 1713332 10月 25 18:22 ospfd
-rwxr-xr-x. 1 root root 1027235 10月 25 18:22 ripd
-rwxr-xr-x. 1 root root 895162 10月 25 18:22 ripngd
-rwxr-xr-x. 1 root root 860516 10月 25 18:22 zebra
[root@RS1 zebra-0.95a]#
运行各个模块
各个zebra模块运行时需要事先定义一个配置文件(*.conf),可直接使用样本配置文件。
# cd /usr/local/etc
# cp zebra.conf.sample zebra.conf
可通过-h参数查看help:
可使用-d参数以后台进程模式启动各模块,比如zebra: # zebra –d
[root@RS1 ~]# ps -ef |grep zebra
root 3919 2572 0 18:26 pts/0 00:00:00 zebra –d
root 3948 3927 0 18:27 pts/1 00:00:00 grep zebra
[root@RS1 ~]# lsof -i:2601
COMMAND PID USER FD TYPE DEVICE SIZE/OFF NODE NAME
zebra 3919 root 10u IPv4 19685 0t0 TCP *:discp-client (LISTEN)
[root@RS1 ~]#
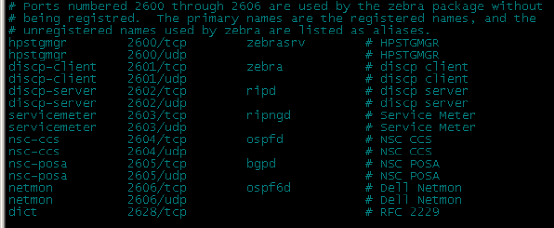
*:discp-client (LISTEN)
zebra-0.95a安装好后会自动往系统/etc/servics中添加定义
配置配置
zebra是基本进程,诸如路由器hostname、接口IP等基本信息都在这个模块中配置。
可通过以下命令进入zebra模块
telnet localhost 2601
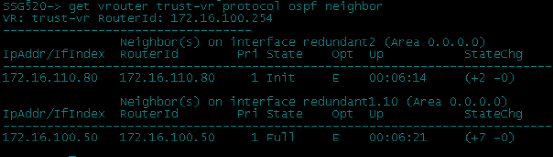
很奇怪 SSG520可以获得OSPF邻居而RS1和AS1却获得不了。关闭防火墙试下

结果可以获得。OK
接下来关闭所有机器的防火墙
检查selinux服务并关闭
#vi /etc/selinux/config
确认里面的SELINUX字段的值是disabled,如果不是则改为disabled。
service iptables stop
chkconfig iptables off
AS

RS

切换到本机的SHELL下 rouer -n
发现动态路由并没有更新到本机的路由表
AS
在路由界面下 修改BOND1的地址 为172.16.110.81/24
RS
在路由界面下 修改BOND1的地址 为172.16.100.51/24
逻辑结构就变成这样了
动态路由出来了。
AS
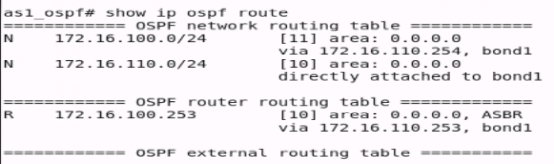

当我关闭SSG 520后 路由自动切换到了ASG425
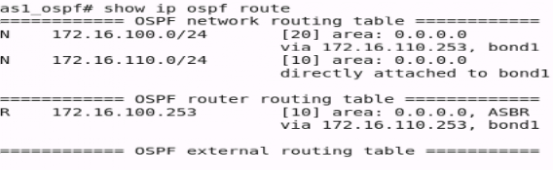

切换速度非常快 根本就感觉不出来。

RS
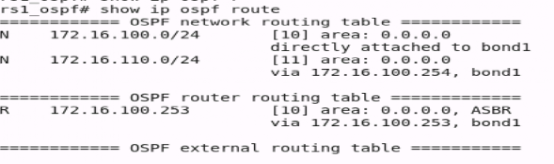

当我关闭SSG 520后 路由自动切换到了ASG425

到此我们的目的达成了。
贴出配置
As1
as1_route#
[root@AS1 ~]# telnet 127.0.0.1 2601
Trying 127.0.0.1...
Connected to 127.0.0.1.
Escape character is '^]'.
Hello, this is zebra (version 0.95a).
Copyright 1996-2004 Kunihiro Ishiguro.
User Access Verification
Password:
as1_route> en
Password:
as1_route# show run
Current configuration:
!
hostname as1_route
password cisco
enable password cisco
!
interface lo
!
interface eth0
ipv6 nd suppress-ra
!
interface eth1
ipv6 nd suppress-ra
!
interface eth2
ipv6 nd suppress-ra
!
interface eth3
ipv6 nd suppress-ra
!
interface bond0
ipv6 nd suppress-ra
!
interface bond1
ip address 172.16.110.81/24
ipv6 nd suppress-ra
!
interface virbr0
ipv6 nd suppress-ra
!
interface virbr0-nic
ipv6 nd suppress-ra
!
table 1
no ip forwarding
no ipv6 forwarding
!
line vty
exec-timeout 0 0
!
End
as1_ospf#
[root@AS1 ~]# telnet 127.0.0.1 2604
Trying 127.0.0.1...
Connected to 127.0.0.1.
Escape character is '^]'.
Hello, this is zebra (version 0.95a).
Copyright 1996-2004 Kunihiro Ishiguro.
User Access Verification
Password:
as1_ospf> en
as1_ospf# show run
Current configuration:
!
hostname as1_ospf
password cisco
log stdout
!
!
!
interface lo
!
interface eth0
!
interface eth1
!
interface eth2
!
interface eth3
!
interface bond0
!
interface bond1
!
interface virbr0
!
interface virbr0-nic
!
router ospf
ospf router-id 172.16.110.81
network 172.16.100.0/24 area 0.0.0.0
network 172.16.110.0/24 area 0.0.0.0
!
line vty
!
end
SSG 520
SSG520-> get vrouter trust-vr protocol ospf config
VR: trust-vr RouterId: 172.16.100.254
----------------------------------
set protocol ospf
set enable
set area 0.0.0.0 range 172.16.100.0 255.255.255.0 advertise
set area 0.0.0.0 range 172.16.110.0 255.255.255.0 advertise
exit
set interface redundant1.10 protocol ospf area 0.0.0.0
set interface redundant1.10 protocol ospf enable
set interface redundant2 protocol ospf area 0.0.0.0
set interface redundant2 protocol ospf enable
SSG520->
ASG 425
ASG425 不允许ROOT用户登录SSH,需要一堆公匙 秘匙 就不用了登录SSH了 直接截图
RS1
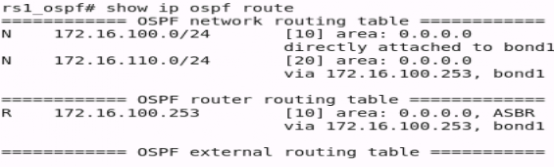
rs1_route#
[root@RS1 ~]# telnet 127.0.0.1 2601
Trying 127.0.0.1...
Connected to 127.0.0.1.
Escape character is '^]'.
Hello, this is zebra (version 0.95a).
Copyright 1996-2004 Kunihiro Ishiguro.
User Access Verification
Password:
rs1_route> en
Password:
rs1_route# show run
Current configuration:
!
hostname rs1_route
password cisco
enable password cisco
!
interface lo
!
interface eth0
ipv6 nd suppress-ra
!
interface eth1
ipv6 nd suppress-ra
!
interface eth2
ipv6 nd suppress-ra
!
interface eth3
ipv6 nd suppress-ra
!
interface bond0
ipv6 nd suppress-ra
!
interface bond1
ip address 172.16.100.51/24
ipv6 nd suppress-ra
!
interface virbr0
ipv6 nd suppress-ra
!
interface virbr0-nic
ipv6 nd suppress-ra
!
!
line vty
!
End
rs1_ospf#
[root@RS1 ~]# telnet 127.0.0.1 2604
Trying 127.0.0.1...
Connected to 127.0.0.1.
Escape character is '^]'.
Hello, this is zebra (version 0.95a).
Copyright 1996-2004 Kunihiro Ishiguro.
User Access Verification
Password:
rs1_ospf> en
rs1_ospf# show run
Current configuration:
!
hostname rs1_ospf
password cisco
log stdout
!
!
!
interface lo
!
interface eth0
!
interface eth1
!
interface eth2
!
interface eth3
!
interface bond0
!
interface bond1
!
interface virbr0
!
interface virbr0-nic
!
router ospf
ospf router-id 172.16.100.51
network 172.16.100.0/24 area 0.0.0.0
network 172.16.110.0/24 area 0.0.0.0
!
line vty
!
end
现在把 zebra -d 和ospfd -d加入 启动脚本
[root@RS1 ~]# vi /etc/rc.d/rc.local
#!/bin/sh
#
# This script will be executed *after* all the other init scripts.
# You can put your own initialization stuff in here if you don't
# want to do the full Sys V style init stuff.
touch /var/lock/subsys/local
#新增加
/usr/local/sbin/zebra -d
/usr/local/sbin/ospfd -d
接下来重启系统验证一下。
结果RS 1正常执行 AS1需要手动执行
网上搜索了半天 结果想起来是不是权限不对
查看权限果真不对 改在755就好了
chmod 755 /etc/rc.local
全部搞定
第五种方法
还有一种很简单的解决思路,写个脚本
自动添加网关。 这是我网上COPY的
但是我认为这种方法在生产环境下太危险了。一直跑一个死循环脚本。万一出了问题,系统就崩溃了
#!/bin/bash
while : #死循环
do #做下面的事情
route del default #删除以前的默认网关配置
route add default dev ppp0 gw 1.1.1.1 #添加一条网关
while ping -c 1 1.1.1 &> /dev/null #再次进入子循环里面,ping成功也就是为真的话,那么就循环,ping失败跳出循环
do
sleep 1 #ping通后,睡1秒
done
route del default #如果ping不通,来到这个语句。就删除前面ppp0的网关地址
route add default dev ppp1 gw 2.2.2.2 #并且用添加ppp1网关
while ! ping -c 1.1.1.1 &> /dev/null #如果ping不通则为真,ping通跳出循环。继续从上开始了
do
sleep 1
done
done
第六种方法
开始交换机的功能
第一次尝试 使用静态路由
int vlan 100
ip add 172.16.100.1 255.255.255.0
no shu
int vlan 110
ip add 172.16.110.1 255.255.255.0
no shu
ip sla 100
icmp-echo 172.16.110.80
ip sla schedule 100 life forever start-time now
ip sla 110
icmp-echo 172.16.100.50
ip sla schedule 110 life forever start-time now
track 100 rtr 100 reachability
track 110 rtr 110 reachability
route add 172.16.100.0 255.255.255.0 172.16.110.253 10 track 100
route add 172.16.100.0 255.255.255.0 172.16.110.254
route add 172.16.110.0 255.255.255.0 172.16.100.253 10 track 100
route add 172.16.110.0 255.255.255.0 172.16.110.254
结果发现交换机本身实现了主备防火墙切换,
但是交换机下面的PC机把下一条地址设置为交换机VLAN100,110的地址时候,通是通了,不过走的却是交换机本身的路由,绕过了防火墙
分析了一下原因。交换机本身的 VLAN 100 VLAN110 两个IP 是直连路由 拥有最高的优先级,我设置的静态路由根本就不起作用。
想到第二个方法 使用策略路由
ip sla 100
icmp-echo 172.16.110.80
ip sla schedule 100 life forever start-time now
ip sla 101
icmp-echo 172.16.110.90
ip sla schedule 101 life forever start-time now
ip sla 110
icmp-echo 172.16.100.50
ip sla schedule 110 life forever start-time now
ip sla 111
icmp-echo 172.16.100.60
ip sla schedule 111 life forever start-time now
配置SAA检查连通性。并跟踪这结果
track 100 rtr 100 reachability
track 110 rtr 110 reachability
track 101 rtr 101 reachability
track 111 rtr 111 reachability
定义访问控制列表,permit选项为需要重定向的数据包
access-list 100 permit ip 172.16.100.0 0.0.0.255 any
access-list 110 permit ip 172.16.110.0 0.0.0.255 any
定义策略路由
route-map rs permit 10
match ip address 100
set ip next-hop verify-availability 172.16.100.253 10 track 100
set ip next-hop verify-availability 172.16.100.254 64 track 101
route-map as permit 20
match ip address 110
set ip next-hop verify-availability 172.16.110.253 10 track 110
set ip next-hop verify-availability 172.16.110.254 64 track 111
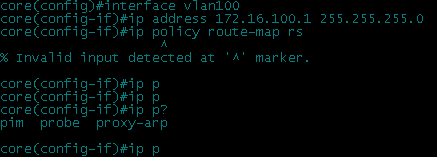
interface vlan100
ip address 172.16.100.1 255.255.255.0
ip policy route-map rs
到这里 结果 奶奶的3750X系列不支持策略路由,百度一下发现需要购买license 只能放弃了
删除还原交换机配置。
总结
经过1天一夜差不多30个小时的奋战终于把问题解决了
最后实际上 是 RS1 RS2 SSG520 ASG425 AS1 AS2 6个设备 都变成了路由器组成了一个OSPF的冗余网络。
 有C++难题,加我!