

主要步骤及代码剖析:
MyListCtrl.h
#pragma once

class CMyListCtrl : public CListCtrl
{
public:
	CMyListCtrl(void);
	~CMyListCtrl(void);

	DECLARE_MESSAGE_MAP()

	virtual void MeasureItem(LPMEASUREITEMSTRUCT lpMeasureItemStruct);
	virtual void OnMeasureItem(int nIDCtl, LPMEASUREITEMSTRUCT lpMeasureItemStruct);
	virtual void DrawItem(LPDRAWITEMSTRUCT lpMeasureItemStruct);

public:
	void SetRowHeigt(int nHeight);

private:
	 int m_nRowHeight;
};
MyListCtrl.cpp:
#include "stdafx.h"
#include "MyListCtrl.h"

BEGIN_MESSAGE_MAP(CMyListCtrl, CHeaderCtrl)
//{{AFX_MSG_MAP(CMyListCtrl)
// NOTE - the ClassWizard will add and remove mapping macros here.
	ON_WM_MEASUREITEM_REFLECT()
    ON_WM_MEASUREITEM()
    ON_WM_DRAWITEM()
//}}AFX_MSG_MAP
END_MESSAGE_MAP()

CMyListCtrl::CMyListCtrl(void)
{
}


CMyListCtrl::~CMyListCtrl(void)
{
}

void CMyListCtrl::MeasureItem(LPMEASUREITEMSTRUCT lpMeasureItemStruct)
{
    if (m_nRowHeight>0)
    {
        lpMeasureItemStruct->itemHeight = m_nRowHeight;
    }
}

void CMyListCtrl::OnMeasureItem(int nIDCtl, LPMEASUREITEMSTRUCT lpMeasureItemStruct)
{
    CListCtrl::OnMeasureItem(nIDCtl, lpMeasureItemStruct);
}

void CMyListCtrl::SetRowHeigt(int nHeight)
{
    m_nRowHeight = nHeight;
    CRect rcWin;
    GetWindowRect(&rcWin);
    WINDOWPOS wp;
    wp.hwnd = m_hWnd;
    wp.cx = rcWin.Width();
    wp.cy = rcWin.Height();
    wp.flags = SWP_NOACTIVATE | SWP_NOMOVE | SWP_NOOWNERZORDER | SWP_NOZORDER;
    SendMessage(WM_WINDOWPOSCHANGED, 0, (LPARAM)&wp);
}

void CMyListCtrl::DrawItem(LPDRAWITEMSTRUCT lpMeasureItemStruct)
{
    CDC* pDC = CDC::FromHandle(lpMeasureItemStruct->hDC);
    LVITEM lvi = {0};
    lvi.mask = LVIF_STATE;//|LVIF_IMAGE;
    lvi.stateMask = LVIS_FOCUSED | LVIS_SELECTED ;
    lvi.iItem = lpMeasureItemStruct->itemID;
    BOOL bGet = GetItem(&lvi);
    //高亮显示
    BOOL bHighlight =((lvi.state & LVIS_DROPHILITED)||((lvi.state & LVIS_SELECTED) &&
        ((GetFocus() == this)|| (GetStyle() & LVS_SHOWSELALWAYS))));
    // 画文本背景
    CRect rcBack = lpMeasureItemStruct->rcItem;
    pDC->SetBkMode(TRANSPARENT);
    if( bHighlight ) //如果被选中
    {
        pDC->SetTextColor(RGB(255,255,255)); //文本为白色
        pDC->FillRect(rcBack, &CBrush(RGB(90,162,0)));
    }
    else
    {
        pDC->SetTextColor(RGB(0,0,0));       //文本为黑色
        pDC->FillRect(rcBack, &CBrush(RGB(255,255,255)));
    }
    if (lpMeasureItemStruct->itemAction & ODA_DRAWENTIRE)
    {
        //写文本
        CString szText;
        int nCollumn = GetHeaderCtrl()->GetItemCount();//列数
        for (int i = 0; i < GetHeaderCtrl()->GetItemCount(); i++)
        { //循环得到文本
            CRect rcItem;
            if ( !GetSubItemRect(lpMeasureItemStruct->itemID, i, LVIR_LABEL, rcItem ))
                continue;
            szText = GetItemText( lpMeasureItemStruct->itemID, i );
            rcItem.left += 5; rcItem.right -= 1;
            pDC->DrawText(szText, lstrlen(szText), &rcItem,  DT_LEFT | DT_VCENTER | DT_NOPREFIX | DT_SINGLELINE);
        }
    }

}
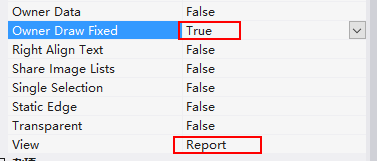
主界面添加一个ListCtrl控件,并设置 Report、Ower draw fixed:
添加一个变量CMyListCtrl m_ListCtrl;,DDX_Control(pDX, IDC_LIST1, m_ListCtrl);
主窗口OnInitDialog中添加代码:
//表格数据初始化
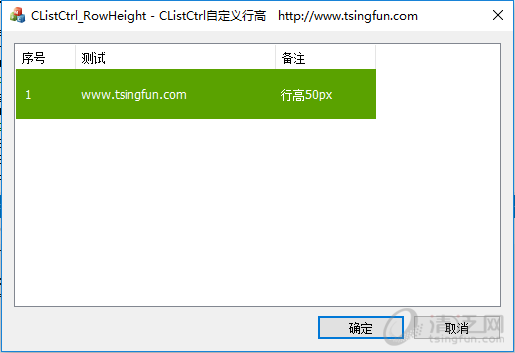
m_ListCtrl.InsertColumn(0, _T("序号"), LVCFMT_LEFT, 60);
m_ListCtrl.InsertColumn(1, _T("测试"), LVCFMT_LEFT, 200);
m_ListCtrl.InsertColumn(2, _T("备注"), LVCFMT_LEFT, 100);
//插入行
int nRow = m_ListCtrl.InsertItem(0, _T("1"));
m_ListCtrl.SetItemText(nRow, 1, _T("www.tsingfun.com")); //设置数据
m_ListCtrl.SetItemText(nRow, 2, _T("行高50px"));
//调用设置行高
m_ListCtrl.SetRowHeigt(50);
OK。工程源码下载:CListCtrl_RowHeight.zip
 有C++难题,加我!